Last week, I was looking through my email inbox and found an email like this: “I have a WordPress site, and I want to sell ebooks through it. I am using the Astra theme for my site. I want to add WooCommerce shop pages, but I don’t know how to do it. Can you tell me the process? Can you give me a step-by-step guide on how to add WooCommerce to WordPress?”
Someone who wants to start an eCommerce business using WordPress as a CMS found it difficult to install and add WooCommerce pages to their site. While installing the plugin is not too difficult, beginners often face challenges.
Today, I thought about solving this problem and decided to write an in-depth blog that will help others add WooCommerce to their site easily. So, let’s get started with WooCommerce using this detailed step-by-step guide.
How to Add WooCommerce to WordPress: Step-by-Step
To use WooCommerce on your WordPress site, you need to install the plugin. It’s very easy to do from the WordPress main dashboard.
Step 1: Install the WooCommerce Plugin
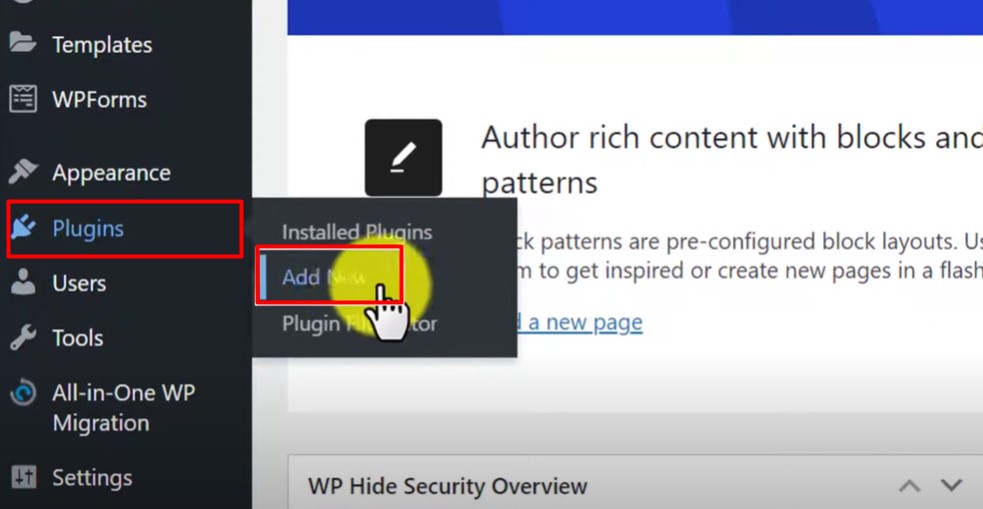
First, look at the top left corner of your main WordPress dashboard and head to the Plugins menu. Click on it and then click on the ‘Add New’ menu. Now look at the top right corner of the WordPress dashboard, and you’ll see a search box. Type ‘WooCommerce,’ press Enter, and wait a moment.
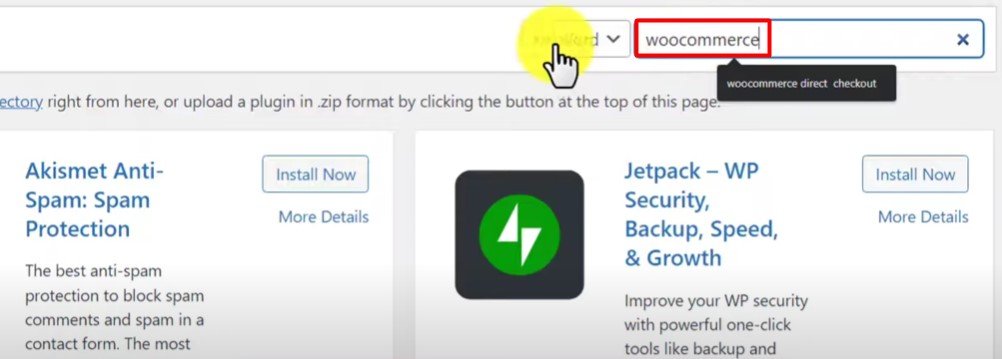
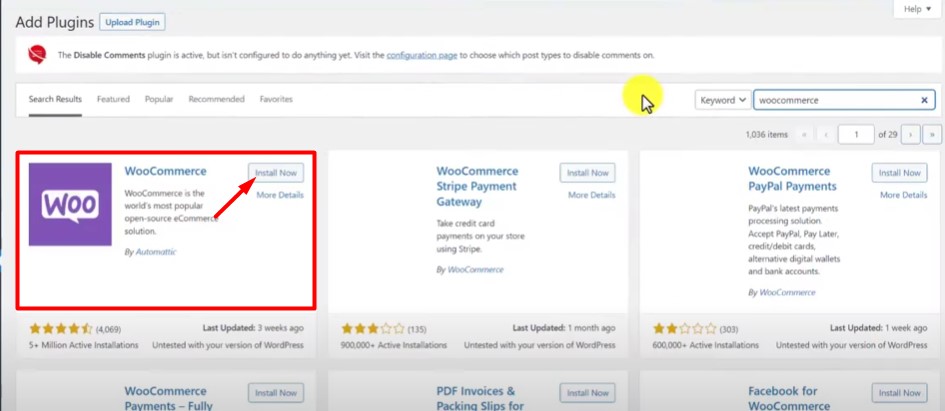
Now you’ll see many plugins appear in the search results, like ‘WooCommerce Stripe Payment Gateway,’ and ‘WooCommerce PayPal Payments.’ These are not the main plugin. If you look at the very top left corner of the search results, you’ll see a plugin with its main logo and the name ‘WooCommerce.’ This is the main plugin, and you need to click on the ‘Install Now’ button, which will instantly begin installing it on your site.
Step 2: Activate the Plugin
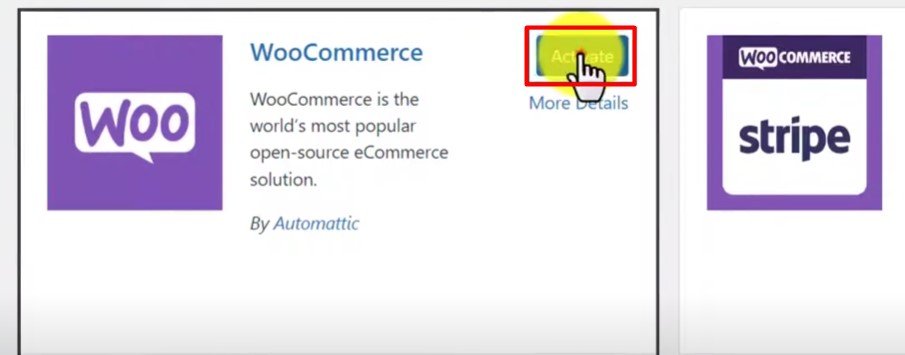
Once the installation is complete, you will see a blue ‘Activate’ button where the ‘Install Now’ button was. Click on it, and after a moment, it will take you to the setup wizard. The setup wizard consists of five phases:
- Store Details
- Industry
- Product Types
- Business Details
- Theme
Step 3: Fill In the Store Details
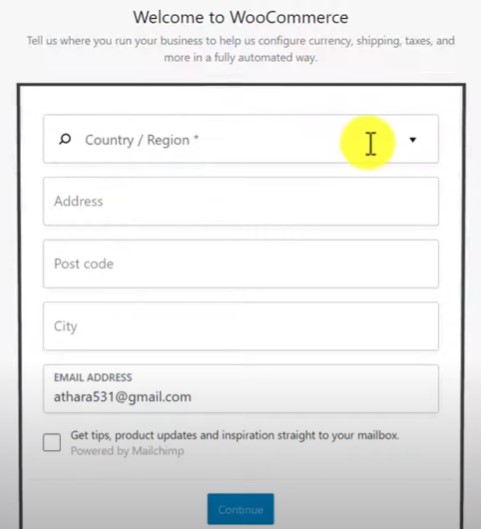
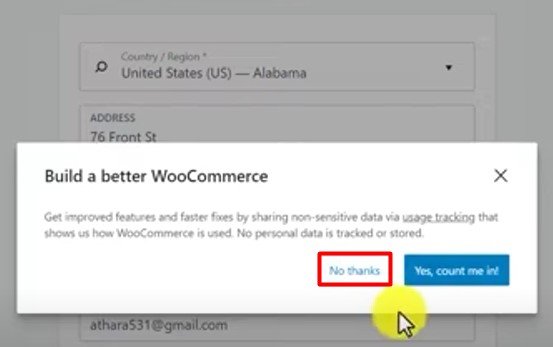
The WooCommerce setup wizard will begin by asking for your store details, such as the country/region, address, postal code, city, and email address. Fill in the boxes with the correct information and click on the ‘Continue’ button. Afterward, a pop-up will appear with a message like this: “Get improved features and faster fixes by sharing non-sensitive data via usage tracking that shows us how WooCommerce is used. No personal data is tracked or stored.” Click the ‘No Thanks’ button.
Step 4: Fill In the Industry Details
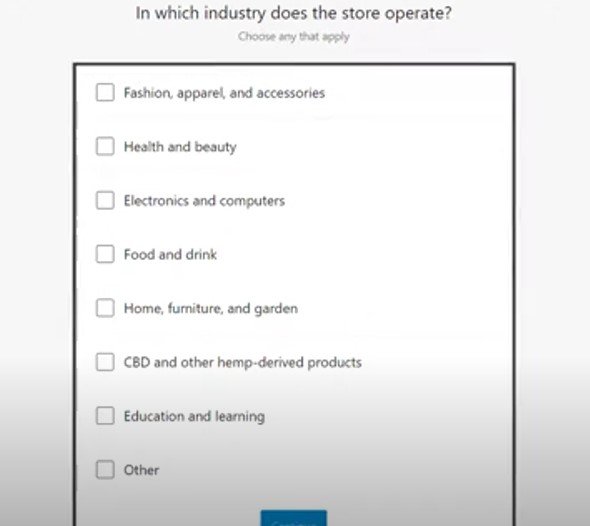
Next, you will need to fill out the industry details for your business. In this menu, you’ll see options like Fashion apparel and accessories, Health and beauty, Electronics and computers, Food and drink, Home furniture and garden, CBD and other hemp-derived products, Education and learning, and Other. Select the correct box that matches your industry. If your industry isn’t listed, check the ‘Other’ box and click on the continue button.
Step 5: Fill In the Product Type Details
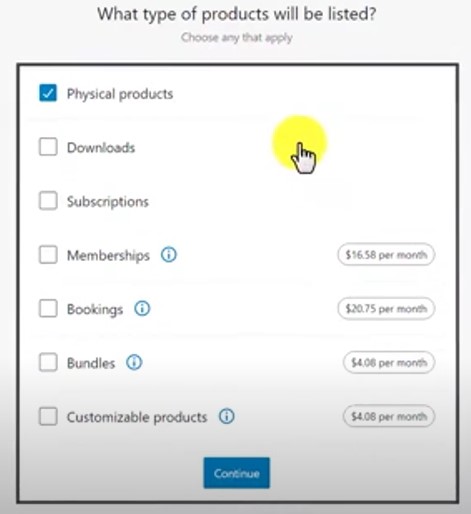
In this phase, you need to provide the details of the products you want to sell. You can check ‘Physical products’ if you sell tangible products. If you sell digital products, check ‘Downloads.’ Select your product type options from the menu and click on the ‘Continue’ button.
Step 6: Business Details
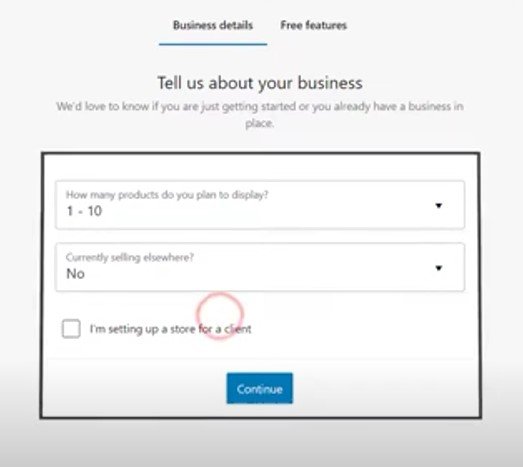
For business details, you need to specify how many products you want to display. For example, you can select the ‘1-10’ option. If you’re not currently selling elsewhere, select ‘No,’ or choose another option that fits your situation. Now, click on the ‘Continue’ button. Uncheck the box that says ‘Add recommended business features to my site’ and click ‘Continue’ again.
Now another screen will appear for the Theme phase. Scroll down to the bottom of the page and click on ‘Skip This Step.’ You’ve now successfully installed the WooCommerce plugin.
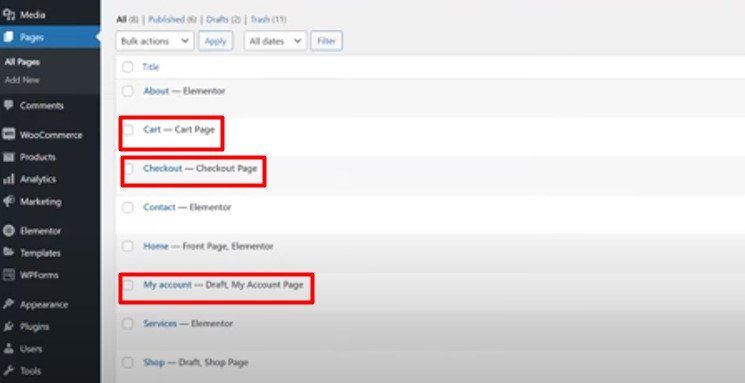
If you navigate to Pages > All Pages from the left menu of the main dashboard, you will see different required pages like Cart, Checkout, My Account, etc., created automatically.
Extending WooCommerce Functionality
Now you can extend the functionality of your store by adding some great extensions. You can set up payment gateways, shipping, storefront themes, etc.
Setting up Payment Gateways
Now, you can set up your preferred payment gateway. There are two options: PayPal and Stripe. These are the most popular payment gateways worldwide, but you can easily add others based on where you live.
Stripe: To set up Stripe, you’ll need to add your Stripe account keys to the WooCommerce Stripe page. This is a simple copy-and-paste task.
PayPal: If you want to use PayPal, you’ll find a button built into the WooCommerce settings page. Click on it, and it will grab your API keys from your PayPal account. Simply sign in to your PayPal account when prompted.
Setting up Shipping
In this step, you need to set up shipping. To get live rates on your shipping (if you are in the United States or Canada), you can use WooCommerce Jetpack. Select the standard weights and measurement units from the given options. WooCommerce will usually set this up adequately based on the location information you provided during the first step of the installation process. It’s important to note that Jetpack is not free; however, live shipping rates and live taxes are free.
Recommended Settings
WooCommerce will recommend you install and activate the Storefront theme, which is developed and designed for WooCommerce. This is the default theme WooCommerce recommends for a nice look and better performance. However, if you already have a theme installed and are not experiencing any issues, you don’t need to install Storefront. You can learn more about eCommerce Website design ideas to improve your website design.
Most WordPress themes are compatible with WooCommerce, so you don’t need to worry about installing Storefront unless you face compatibility issues. For speed optimization and better SEO results, it’s recommended to use lightweight themes, which will make your site load faster, resulting in a better conversion rate.
WooCommerce has an excellent feature for automating taxes. Calculating error-free taxes is difficult, but WooCommerce provides a solution. WooCommerce Jetpack makes it easier, and in this step, WooCommerce will ask you to install it.
Next, the wizard will ask you to install MailChimp. If you use another email marketing solution or don’t want to use MailChimp, you can uncheck the box and click the ‘Continue’ button.
Click on the ‘Continue with Jetpack’ button. Jetpack will ask you to set up an account with WordPress.com. If you already have a WordPress.com account, you can continue using that.
Now, you are almost ready to use WooCommerce on your WordPress site!
Add a Product to WooCommerce
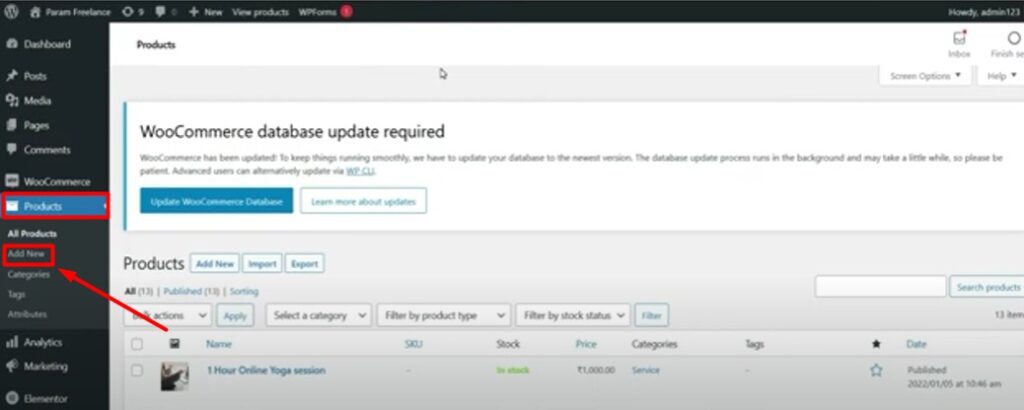
To add a product, go to the Products menu on the left side of the main dashboard and click on ‘Add New.’ This will open a new interface to add your product. In this example, we will add a digital product like an ebook.
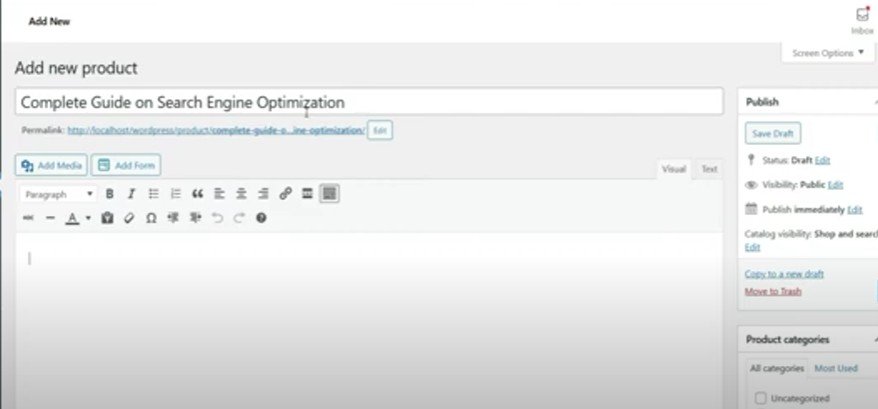
At the top of the page, add your ebook title. You can also edit the URL of the product by clicking the Edit button under the product title in the Permalink section. Below the Permalink, you’ll see a larger box where you can put your product description.
Now, choose your product type. Since we are creating a product page for a downloadable ebook, set the type as a ‘Simple Product.’ Don’t forget to check the ‘Virtual’ and ‘Downloadable’ boxes. If you don’t, WooCommerce will consider it a physical product, expect you to ship it, and not deliver it to your ebook customer.
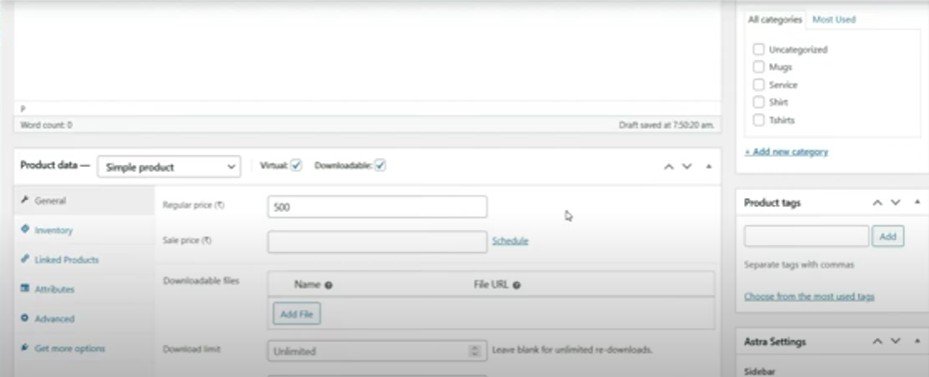
Below that, you’ll see a box for regular price and sale price under the general settings. Set the price of your ebook in the Regular price box and the sale price (if applicable), which you can schedule for a specified period.
You’ll also need to specify the file you want to deliver to your customer as a downloadable book. Click ‘Add File,’ then ‘Choose File.’ The WordPress media uploader will open, and you can select an existing uploaded file or choose a new one from your hard drive.
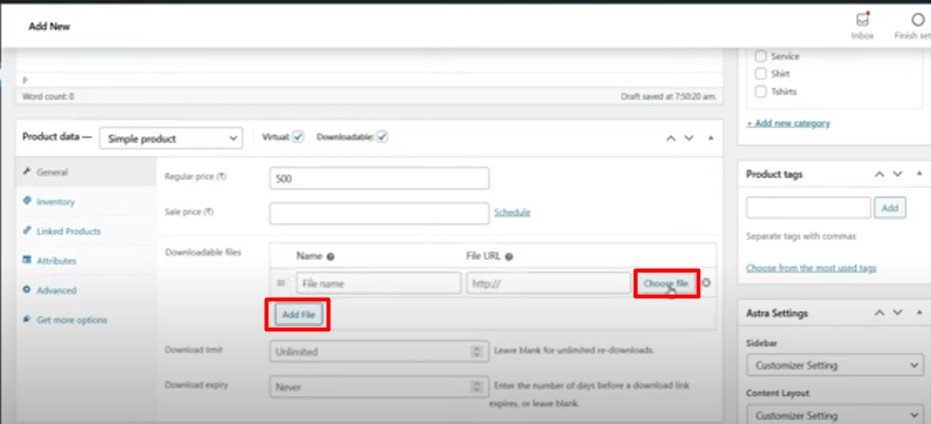
Next, you can set the number of times a customer can download the ebook and specify how many days the download link will be active. This helps prevent unauthorized sharing of the links.
Scroll down to the bottom to add a short description for the product, which customers will see outside the product image.
Finally, upload a product image of the ebook, usually the cover.
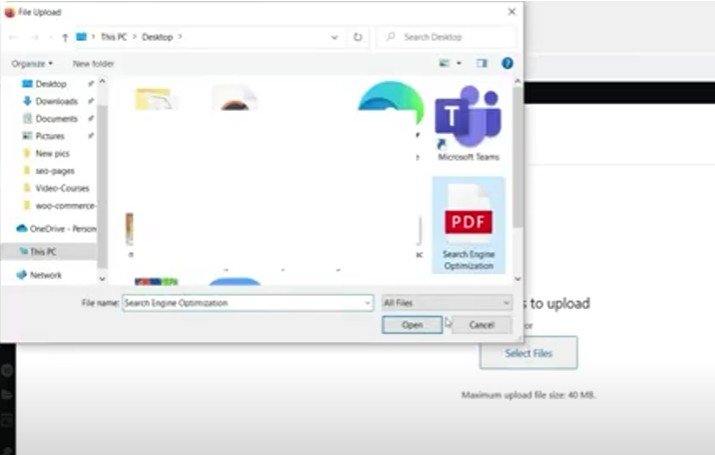
You’ll find this section on the right side of the screen. Click on ‘Select Product Image,’ and the WordPress Media Gallery will open. Add the product image by either uploading it from your computer or selecting one already in the gallery.
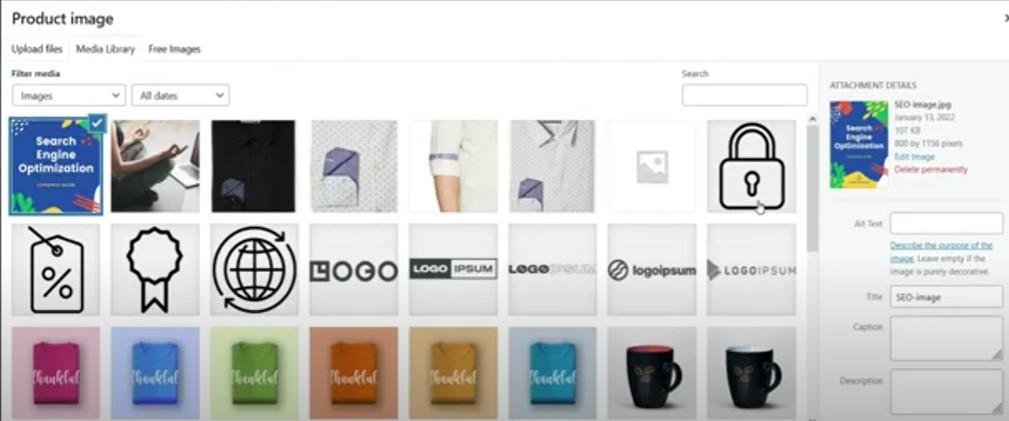
Now you’re ready to publish your ebook on the site—and you’re done!


